Showing posts with label Mail Art. Show all posts

Wednesday, November 18, 2015

Dia de los Muertos

At the Lost Coast Portal to Creativity this month, we had a Day of the Dead event, or Dia de los Muertos. This means it's All Soul's Day, celebrated in early November in various European and Latin American countries, especially Mexico. The holiday focuses on gatherings of family and friends to pray for and remember friends and family who has passed, and help support their spiritual journey.

I made some Dia de los Muertos ATCs, and I really liked the monochromatic look, with a splash of color : 

Here is my make, 3 ATC's featuring the Skull Flourish from Lost Coast Designs :

For these ATC's I wanted a very textured background. I used molding paste and colored it with grey acrylic paint. Then I applied it to the ATC base with a pallet knife and stamped into it with the skull flourish while the now grey paste was still wet :


 I then left the molding paste to dry and went to clean my stamp. I just used an old toothbrush and bar of soap. Its important to wash the stamp before the paste dries on it :


I sprayed the ATC background with black and white dylusions and let it blend and drip. Then I left it to dry. When it was dry I tore the edges, and sponged lightly with grey ink.

I stamped the skull flourish in black ink onto La Blanche card stock, and added a little embossing powder while the ink was still wet and heat set it. I fussy cut it and glued it onto my textured background. I used a C3 copics to go over some of the shading on the skull to add dimension.

See the texture : 

I typed the words on my typewriter and added the flowers and embellishment.

Finally I matted the textured ATC front onto grey card stock that I had edged in grey ink and stamped the mini skulls. It is very faint, but if you look closely you can see them along the edges. 

Here are individual pics of the three ATC's :


Don't forget that we have our monthly challenge on the Lost Coast Postal to Creativity

This month we are asking you to make Mail Art. I love mail art, there is nothing nicer than receiving a wonderfully decorated envelope in the mail, stamped and addressed to you.

Here is my creation, using one of the mini flying ladies, circle frame, Old Typewriter Alphabet SOPA from Lost Coast Designs and Carmen's Veranda background stamp, Postcard background.


Thanks for stopping by, I hope you found some inspiration here, Nikki x

Friday, September 25, 2015

Send Some Love

Hello Again!

Tera  AKA The Crafty Sugar Addict

Here with another fun Stamped piece of Mail Art!


I have to say I just love this Buddha stamp!! He's the perfect size for everything from pocket letters,  to cards, to even envelope art!! 

Stamps Used: 

I also used metallic sprays and some watercolor to finish everything off :D 


Friday, July 17, 2015

Big Eyed Cowgirls and Cowboys

Hi everyone, Nikki here using some images from Carmen's Veranda, love the Big Eyed Girls and Boy images.

Firstly I made this mail art :
It was so cool when I wrote the address on , it  now says : "Are you Liz (name and address) feeling lucky'.  LOL

The background is dylusions sprays, then I creased the envelope and sponged a little green onto the ground to give it some texture. I stamped the postcard background and I used the old typewriter alphabet from Lost Coast Designs for the wording. The big eyed girl and boy are stamped in stazon, colored with inktense pencils and fussy cut. I sponged the edges and added white gel pen detail.

 I like to make Altered Playing Cards (APC's) and Artist Trading Cards (ATC's) and these images are the perfect size.

I have used Big Eyed Shooter Girl for this APC:
I love the Western theme, and the monochromatic look. 

Just a reminder about our challenge blog, The Lost Coast Portal to Creativity, this months challenge is Zentangle. 

Hope you will come and join us :) Nikki x

Thursday, June 25, 2015

Dream Big

So the CityScape stamp is one of my favorites and since we're celebrating our new Challenge blog in which we have a New Stamp release event until July 22nd going, it is getting a lot of love from me this month :) This piece is inspired by the movie Upside Down which I have seen recently.Such a cool idea, those two world colliding in one.

A few years ago I found a cool marble set which I had stored somewhere for ages. And I finally used it to make wonderful backgrounds for journal/mailart pages. Like the background I used for this piece. I simply stamped the city scape on the top and bottom and embossed with black embossing powder. To fill up the stark whiteness in between the marbles, I sprayed chalk mist powder in blue over the card. (it is handy to create a 'spray box' to put your projects in so you don't spray it all over your desk or clothes etc..)  DREAM BIG in the middle to finish off the piece. I used doodle letter stamp set and colored in with black fineliner. A reminder to always let myself dream, desire and aspire!

Thanks for stopping by!
namaste
Tarah

Tuesday, May 12, 2015

Going Postal...

Hello! 
It's me Tera here again with another fun and easy tutorial for you using the AMAZING  LCD stamps!! 


Today I want to share this fun Buddha postcard. 

Supplies: 
LCD Stamps- Buddha from Asian set (HERE) and Agregate background (HERE
Paint in yellow, green, turquoise (mine are all the new Dylusions paints)
Tim Holtz sponge dabbers (or painting method of choice.. these are just fast and easy to slap paint down)
Black Paper for the background dry embossed with the Tim Holtz rays embossing folder (you could probably get a similar effect with the rays stencil if you don't have an embossing machine) 
Tim Holtz or other rub-ons (optional for quote in postcard)
Scissors and Glue of choice
Black Pan pastel (for optional shading)


Start by dry painting (dry brushing) your embossed background with your green and turquoises paints letting some black show through (set aside to dry). Next paint a piece of cardstock yellow to stamp your Buddha on (or color with yellow Highlighters?). 
Now that both are dry stamp the Agregate background on your embossed cardstock, and stamp your Buddha on the yellow (you can also add your rub-ons on your cardstock at this time if you plan to use some).  Cut your Buddha out leaving a tiny boarder to help him "pop" off the page. 
Glue everything together and you have a finished piece!!


(Use good glue if using as a postcard. I used Glossy Accents)


You can add this to a greeting card backing or just mail as is :D 

Wednesday, April 1, 2015

A Game of Bingo!

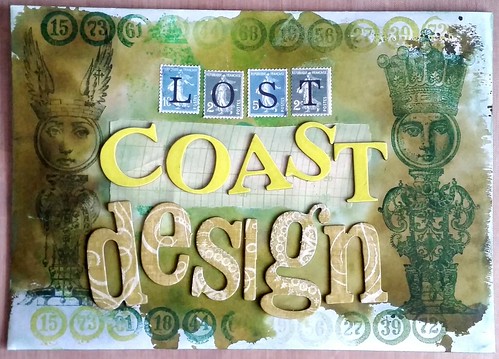
Hi everyone! My name is Tarah (aka Miss Thundercat) and this is my first post here. I am excited to be part of this fantastic DT. My focus is on mail art and ATCs so my posts are mostly on how you can incorporate the wonderful Lost Coast Designs and Carmen's Veranda rubber stamps in those type of projects.

Today I would like to share with you this mail art inspired piece which I call "A Game of Bingo!"

LCD a game of bingo

Stamps used:
Bingo Border
the King and Queen

Other materials:
Distress ink pads peeled paint and shabby shutters
Distress stain Peeled paint
Staz-on olive green ink pad
Kaleidacolor caribbean sea ink pad
green metallic rub ons
Letter's by K's Company and Basic Grey
Alphabet Postage stickers by cavallini and co

First I made background with distress inks which I pressed on my kraft sheet and sprayed with water. Then added a smear of the peeled paint distress stain. I pressed the envelope down on the kraft sheet to get the blot effect then set it aside to dry. I used Staz-On Olive Green to stamp the King and Queen on either side. The kaleidacolor ink pad I used for the bingo border stamp on the top and bottom of the envelope. I added a vintage piece of measurement paper in the middle (that could function as the space to write the address down). Also ripped the edges of that paper slightly and added a bit of metallic green pearl rubs on the edges of the paper and the white parts of the envelope.
LCD a game of bingo 2

Since I have so many letter stickers/chips and stencils, I like to play around with positions and variations before I settle with the permanent design. The 'LOST' letters in faux postage stamps really gives this the complete mail art feel I was looking for so I eventually settled for that.

Hope this inspired you to play around with game and letter pieces.
Thanks for stopping by!

Thursday, March 5, 2015

We're all Mad Here

Hello! 
Tera Here with my 1st post for Lost Coast Designs!!! 
My love is Mail Art so I wanted to share that love with you!
This piece is also a perfect example for this months Challenge 10: Use some red


Stamps Used:
Perspective Floor
Four Alices

Other Supplies:
washi tape
shabby shutters distress ink
distress markers
VersaFine ink

I started by stamping Alice in the top left of the envelope, then I masked her off.
Next I stamped the perspective floor.  I used distress markers to color my alice stamp then sponged the shabby shutters green on the background. To finish by piece off I used some washi tape that I though felt like wonderland to me. :)

Thank you for visiting!!