Showing posts with label chess pieces. Show all posts

Wednesday, March 29, 2017

UNMASKED! Building a (Black and White) Collage Doll with LCD Stamps

Greetings, Lost Coasters! Today I have a tutorial for you on how I made this zany collaged doll for our Black & White challenge over at the Lost Coast Portal to Creativity. These same principles will help you build any sort of rubber-stamped collage.


PLEASE NOTE: This is the Cliff Notes version of the tutorial… For tons of photos, explanatory details, and A VERY COOL REVEAL VIDEO showing the masks being peeled off layer by layer to reveal the final collage, visit my blog! I lay it all out for you there!  😁

1. Plan out the composition. 

Gather the stamp images you'd like to use and start playing with them. You can stamp them and roughly cut them out to experiment with how to position them relative to each other. You could also use software such as Photoshop or InDesign to make a sketch. 

The stamps I used to make this piece were:

Elements from the Doll Accessories Set
Black Flourish
Bishop from Chess Set

2) Decide on your focal point. 

In all likelihood, this will be the image you stamp first--the one that appears on top of all the other layers in the collage, in the foreground. In my composition, it was the eyeglasses image.

3) Determine the order of operations.

Now you have to figure out the order in which you are going to stamp. Determine what is "foreground" and what is "background," and proceed in a logical order. The things that go behind, in the background, get stamped last.

4) Using your sketch as a blueprint...start stamping! 

I recommend the use of a stamp positioner or stamp press tool such as the MISTI. This allows you place each stamp exactly where you want it to print, and to re-ink the stamp to get perfect coverage in case an image prints a little unevenly the first time. 


5) Cut a mask for each image as you work. 

After you stamp each image on the "real" paper, stamp off onto some scrap paper, and cut that print out to use as a mask. I used repositionable adhesive to stick down my masks precisely over each image before stamping the next layer atop it. 

6) Remove the masks; oooh and aaaah.

Again, for a much more in-depth explanation packed with tons of tips, visit me here. And if you have any questions whatsoever about this process, please ask me in the comments over there. I’d love to help you guys try this out if you’ve never done a stamp collage before!




Thursday, February 23, 2017

February Is For Lovers: Or, When I Am King You Shall Be Queen

Hello stamplings! Today for your creative delectation I'm going to walk you through the piece I made for our Lovers event, "When I Am King." (You have two more days to enter your lovers-themed art --until midnight, February 25th--for your chance to win cool stuff! Click on the link in this paragraph and find out the deets if you haven't already entered!)

Do you guys know the children's rhyme "Lavender's blue, dilly dilly"? I took it as my inspiration as I was looking at our fab king and queen chess pieces from the Chess Set. You know how some men will promise you anything, right? LOL So here's our lovable braggart king making you his queen.


Here's how I did it.

Using permanent (waterproof) ink, stamp the awesome king and queen onto hot-press (for a smooth surface) watercolor paper. Stamp and cut masks for the figures, and place the masks over the stamped images.

Sprinkle blue, purple, and gray Nuance powders liberally about! At this point, your piece will look approximately like this:


Now go town and mist the powders with water to your heart's content. Watch the magic happen as they bloom and blend! I like to leave them a little dry in spots for texture, but you're the boss here.

I next used a checkerboard stencil to suggest a chess board, and spritzed some more color through the stencil. (Did you know that you can use the Nuance Powders to make your own sprays? Yep--just put a bit in a mister, add water, and you're good to go!)

Let dry, and stamp "king" and "queen" with the Old Typewriter Alphabet, and emboss with silver EP. I outlined the letters in black artist pen to help them stand out, which also has the advantage of giving the letters more of a funky, arty, handmade look. The other text was computer-generated and collaged on.

With the masks still in place, drizzle and splotch some white and silver acrylic paint to bring light to some of the dark areas and add a little dimension to the piece.

When dry, remove the masks, and paint the figures with pale washes of lavender, blue, and purple. Accent the figures with sparkly silver glitter gel pen to further catch the light. Edge the piece with lavender chalk ink.


You are done! Admire the fruits of your labor...and maybe go give the king a kiss for elevating you to royal status!


Saturday, September 5, 2015

Artful Artist Trading Cards (ATC's)

Hello Again!!! 

It's Tera, Here to show you some super fun ATC's! 


( I LOVE Artist Trading Cards!!! They are so fun to make and collect!! and Now you can even add the to Pocket Letters!!) 

Stamps Used:   

To Create these ATC's I started with some Scraps of painted art journal paper given to me by my mom (Her blog is HERE). They were created with Dylusions paints and various stencils. I cut 3 pieces to 2x3in for stamping on and 3 pieces to 2.25 x 3.25 in to matte on. the final layer is black card stock in standard 2.5 x 3.5 in. I stamped my images on the top layer of each and set them aside to dry (ink on paint can some times be temperamental... although this paint plays well with stamps)

While the tops dried I glued the bottom and middle layers together. 
Next I glued the stamped images to their bases and used a fine tip black pen to draw on some faux stitching.... (I love that it pulls the layers together). 

Lastly I added a few hints of color to small parts of each card to help different features stand out a little more :D   Detailed photos below 


 I hope these inspire you to create some fun pieces too!! I Just love how these came out!!! :D 


Wednesday, April 1, 2015

A Game of Bingo!

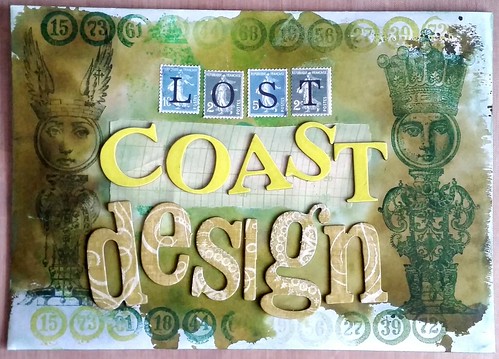
Hi everyone! My name is Tarah (aka Miss Thundercat) and this is my first post here. I am excited to be part of this fantastic DT. My focus is on mail art and ATCs so my posts are mostly on how you can incorporate the wonderful Lost Coast Designs and Carmen's Veranda rubber stamps in those type of projects.

Today I would like to share with you this mail art inspired piece which I call "A Game of Bingo!"

LCD a game of bingo

Stamps used:
Bingo Border
the King and Queen

Other materials:
Distress ink pads peeled paint and shabby shutters
Distress stain Peeled paint
Staz-on olive green ink pad
Kaleidacolor caribbean sea ink pad
green metallic rub ons
Letter's by K's Company and Basic Grey
Alphabet Postage stickers by cavallini and co

First I made background with distress inks which I pressed on my kraft sheet and sprayed with water. Then added a smear of the peeled paint distress stain. I pressed the envelope down on the kraft sheet to get the blot effect then set it aside to dry. I used Staz-On Olive Green to stamp the King and Queen on either side. The kaleidacolor ink pad I used for the bingo border stamp on the top and bottom of the envelope. I added a vintage piece of measurement paper in the middle (that could function as the space to write the address down). Also ripped the edges of that paper slightly and added a bit of metallic green pearl rubs on the edges of the paper and the white parts of the envelope.
LCD a game of bingo 2

Since I have so many letter stickers/chips and stencils, I like to play around with positions and variations before I settle with the permanent design. The 'LOST' letters in faux postage stamps really gives this the complete mail art feel I was looking for so I eventually settled for that.

Hope this inspired you to play around with game and letter pieces.
Thanks for stopping by!

Tuesday, August 27, 2013

Terrific Tag Techniques!

Hello Friends! Lindsay here again with another technique video, we will be making some wonderful tags using the Chess Pieces stamp set from Lost Coast Designs.


I'll also show you how I made the matching pocket card too. Here is a tip, first I made the envelope and used the leftover paper from my Kreate-a-lope to make the pocket on the card to hold the tag, no waste and it matched perfectly!

Here is the video to show you how it was done, mind you I filmed it late at night so I might not be as perky as usual:)

Pretty easy huh? Don't be afraid to try some of Lost Coast Designs unusual stamps, they can be the most fun, and as the video proves, easiest images to work with! Thanks for stopping by and til next time happy crafting!