Showing posts with label stencils. Show all posts

Wednesday, August 16, 2017

Wistful Butterflly Lady

Greetings to all the Lost Coasters checking out the Review!  It's Laurie here with another project to share with you.  This one was made for the Lost Coast August Challenge - Stenciled Background.  I really never got into stencils until about a year or so ago, and now I wonder what took me so long!  So many things you can do with stencils - the sky's the limit!

I created this card with the Head In Hands stamp from Lost Coast Designs.  I love this stamp - it has a very peaceful, gentle feel about it that really appeals to me.
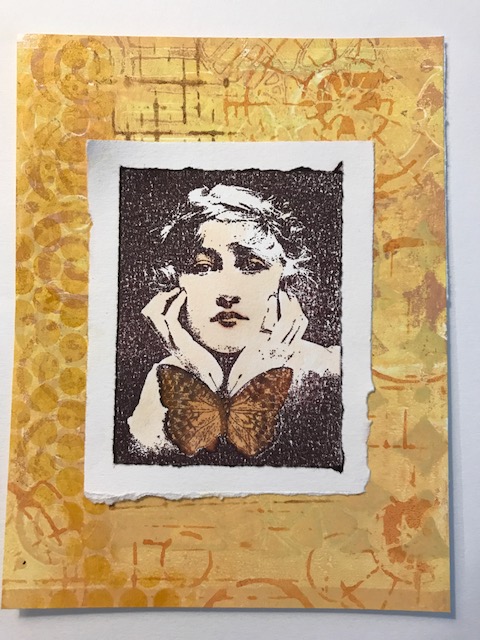

I stamped with dark brown ink on white paper then tore around all the edges to give it a rough appearance.  That got mounted onto another torn edges piece in white.  I colored the lady and the butterfly with Copic markers, just keeping the composition and color palette simple.

The background was made with my Gelli plate.  I started with yellow paint for my background then used some stencils with orange and brown paints.   I used three or four different stencils here to give the background some interesting shapes and colors.  Looking at her in this piece, it almost seems that she is looking right into my eyes!!

Don't forget to join up your stenciled stamped creations to the 
Lost Coast Portal to Creativity.  
You don't need to use Lost Coast Designs or Carmen's Veranda stamps, 
but of course, we would love to see them if you have them!!


Go create and have fun!

Thursday, August 10, 2017

Bad Advice Baby

Hello and welcome to the Lost Coast Review.  Gail here today and I wanted to share how I made my Bad Advice Baby project that you might have seen over at the Lost Coast Portal to Creativity.  This month the challenge is stenciled backgrounds and this is a great way to add depth and interest to your projects.  

I have decided that Happy Skeleton is a baby due to his romper suit and those obviously baby teeth.  Ain't he just so cool!!


I started by stamping and embossing the Free Advice sentiment from Carmen's Veranda.  I sponged Mowed Lawn distress ink through my stencil, flipped it over and sponged Evergreen Bough distress ink.  Flipping the stencil reverses the pattern, with can give a dramatic effect, depending on how symmetrical your stencil is.  This one, which incidently I found in the cake decorating section of the local cheap store, isn't so complex.  


Then I stamped Grunge Border 3" with Spiced Marmelade distress ink.


A bit more interest added using a numbers stencil and Hickory Smoke distress ink.


I stamped, embossed and fussy cut Happy Skeleton and coloured his romper suit with neon gel pens.  I gave him a bit of washi tape to stand on and a pair of googly eyes, to add that extra bit of crazy, and he's good to go.  

Thanks for dropping by.  Do check out The Lost Coast Portal to Creativity for more gorgeous stencily inspiration from the team and the challenge details and linky.  See you there.  Hugz


Sunday, May 8, 2016

Flower Girl In Five Color Combos-Women Rule the World Event


Hello Everyone!
Karen here with you today sharing my projects for the Women Rule the World Event.  We are honoring Mother's Day by making Women themed projects.  You may link up  your Mother's Day and female themed projects on the Portal to Creativity blog.  Any stamps are acceptable, just be sure you add stamping.  There is a really nice prize too!
My projects feature the Flower Girl stamp. I inked the stamp with two different colors of Distress ink to get this interesting effect.  
I also added handmade backgrounds to the cards made with stencils, spray inks, acrylic paints, or a mono printing plate.
Take a look at this lovely Lady!! 


So glad you stopped by!  For more info on making these projects, see the instructions on my blog, Dreaming and Creating. See you next time!
Karen McAlpine

Friday, August 14, 2015

Puppy Love

Hello Again!!! 

It's me Tera here again with some more fun and easy inspiration!!
This time I want to share with you how I made this fun and easy tag for the Circle challenge!!! 
(Have you been over to the challenge blog yet to check it out? Don't forget to enter yours for a chance at a prize!!! Plus there's a lot of fun inspiration over there!!  Check it out HERE ) 


To start I used a #8 tag (the XL one) and added pink and yellow distress stain around the edges. 
(I heat dried it since i have very little patients lol but you can set aside to dry if you'd like) 

Next I stamped my ADORABLE party hat dog (found HERE) in black ink... Isn't he the cutest????

Next I used two of my TCW grunge stencils (pictures of the stencils in my post on June 27th HERE if you'd like a visual ) I sponged black ink through the stencil to add the circles. 
To finish I shadowed around the party dog with my black sparkle pan pastels 
(you can also do this with ink, but i had mine handy). 


See, I told you it was easy!! 
Wouldn't this make the cutest party invitations???  
Or maybe a Doggy Birthday card!!!

Thank you for Hopping in to see me today!!!
Happy creating!!


Monday, March 24, 2014

Lost Coast Design and Stencil Girl Blog Hop Project

Hello!
The Lost Coast Design and Stencil Girl Blog Hop is currently running.  There are prizes!!  Stop by the blogs and leave comments for a chance to win.
The first stop on the blog is:

Stencil Girl Talk

Check out all the details of the hop there.

For my Blog Hop project, I combined Lost Coast stamps and  a Stencil Girl stencil to create a mini accordion book and tag.


Cover unfolded-showing front and back


Click over to my blog, Dreaming and Creating for a full tutorial on making the background papers with a mono printing Plate and instructions to make the mini book.
Check out all the projects on the hop---They will knock your socks off!!
Karen McAlpine

Tuesday, August 27, 2013

Terrific Tag Techniques!

Hello Friends! Lindsay here again with another technique video, we will be making some wonderful tags using the Chess Pieces stamp set from Lost Coast Designs.


I'll also show you how I made the matching pocket card too. Here is a tip, first I made the envelope and used the leftover paper from my Kreate-a-lope to make the pocket on the card to hold the tag, no waste and it matched perfectly!

Here is the video to show you how it was done, mind you I filmed it late at night so I might not be as perky as usual:)

Pretty easy huh? Don't be afraid to try some of Lost Coast Designs unusual stamps, they can be the most fun, and as the video proves, easiest images to work with! Thanks for stopping by and til next time happy crafting!


Thursday, August 15, 2013

One Layer Rainbowy Goodness!

Howdy folks! Lindsay here with another fabulous one layer wonder using the Party Hat Cats stamps set from Lost Coast designs. This card is so quick and easy, you will need: stamps, stencils, dye ink pads, markers, masking tape, cardstock and a scrap of paper. Oh and remember the Roltap mini brayers I showed you how to make a couple weeks ago? We will use them too! Ready to get your craft on? Well, let's get to it!


Wasn't that easy? I hope you give it a try and let me know what you think! Happy crafting!