Friday, April 28, 2017

Forget Me Not

Good morning Lost Coast Designs fans!  This time around I want to share with you how I created the Twinchie I made for the New Stamp Release that was over on the Portal.

I started out by painting a piece of 2x2 matboard black.  Once that was dry, I stamped the Heart from the Fish and Heart Set and colored it in with Primacolor pencils.  I added green metallic thread around the edges and found the sentiment in my stash.

Easy peasy and the black background really sets off the other colors.  You should see how the colors pop in person.

Stay tuned!  As always, there will be more next month from our talented group of designers.

Marilyn aka Tarnished Rose
LCD DT Leader.

Wednesday, April 26, 2017

Hi all Cathy here with my Crayon Smell card.
Don't we all love the smell of a box of new crayons. I know I sure do. That is what I first though of when I made this card.
 So this stamp is from Carmen's Veranda new stamps. I stamped it on Copic friendly paper. Then I colored it with Copic markers. Next I added Glossy Accents to the tops of the crayons. When that was drying I started on the background of the card. I wanted a vintage look so I went though my paper stash and found the one I liked. So then I started on that background. Guess what I used to make it? Bubble wrap and a cap from a old marker. Also paint. I had bubble wrap sitting on my table and I said lets use it for the background. I used the white paint for that one. The cap I used black paint for it. Yes that is it.
Next I cut out the crayon stamp. Edged it in black marker so you don't see the white paper from me cutting it out. Taped that on front of my card, then I printed the saying from the computer. Layered that in black cardstock. That is my card

Monday, April 24, 2017


Another Favorite Background  Technique

Simple Paper Collage


This is one of my favorite background techniques and is simple and fun to do.
I love collage and love working with paper so putting the two together is
a perfect fit and fun project for me.

Here I have created a 4 X 4 card.  I used coordinating paper from a 6 X 6 paper pack 
I had on hand that consisted of predominately pink, blue and green decorative papers.
I started cutting out squares and rectangles of different patterns and arranged
them in a way that looked balanced and interesting to my eye.  Once I had my collage in place, I taped all the pieces together on the back sides then flipped it over and attached it to my
card front.  I punched
a heart out of one of the papers and glued that to the upper right corner.

I then stamped these two cute little birds onto patterned paper with black ink and cut them out.
I attached them atop my collage and dotted the eyes on each bird with crystal effects to give them some dimension.
And voila!  A completed card!

You can find these bird stamps at Lost Coast Designs
under the "Whimsical Birds by Doris Arndt" section.  These are
"Whimsical Flora" and "Whimsical Amelia".
www.lost-coast-designs.com/whimsicalbirds.html

Go forth and create!!


Saturday, April 22, 2017

Feelin' Groovy

Hi and welcome to the weekend circa 1962. Today I'm sharing my groovy cats with you, as part of our new release event. We've been showing our projects over on the Portal To Creativity and this is how my peace loving cats came about.


Not an exciting photo is it! I started by painting a pice of 7.5 x 7.5 with bright yellow acrylic paint. It has a nicer feel to it than just yellow card.
I created my backgound with Andy Skinner and PaperArtsy stencils. On version 1 I used acrylics through the stencil, but these bled underneath, so on version 2 I used Portfolio pastels, and rubbed them through with my finger. Much cleaner (apart from my fingers)


It was looking far too clean, so I used another Andy Skinner stencil and applied random patches of black gesso with a baby wipe, and lots of white Posca pen. 


So that my Cat Trio stood out against the rather jazzy background I kept them mainly in black and white and just used Posca's on their tails.
Next time I shall keep the background simple then I can really go to town with the groovy cats.
The sentiments were printed on the computer, then everything was stuck and sewn down.
If these cats happen to jump into your basket over at the Lost Coast shop I wouldn't judge you. They are certainly favourites of mine!
Have a lovely weekend, and thanks very much for looking.
Sue x
http://suetheiron.blogspot.co.uk/2017/04/feelin-groovy.html


Thursday, April 20, 2017

Her Name Was Lola....

Good morning and happy Thursday. It's Sue here and I'm really happy to be sharing my first piece with you. The current challenge on the Portal To Creativity is 'favourite background techniques' and one of mine is really high tech and involves erm a drinking straw!


I do have some step by steps, but not many because this technique is so simple, but I feel it really packs a punch.


I do like a nice big card, so I cut a piece of glossy card to 7.5 x 7.5 (inches, I'm very old school) It has to be glossy cardstock not photographic paper as this sucks up the ink rather than letting it travel.
Pick a few colours that you like, and one at a time dot a few drops of alcohol ink on the card, and simply blow through the straw. Canned air is also really good for this, but you can give your lungs a workout for free! I kept the inks just to one side so that my girls wouldn't get lost in the colours.

Aren't these Showgirls fabulous! You can add as little or as much colour as you like. I used just a little red Prisma pen, but any alcohol ink pen would work just as well.
I loved the quote, these girls are definitely in their Happy Place These are Carmen's Veranda clear stamps, and some of them will make you laugh so hard you'll blow your coffee out of your nose!

And we're just about finished. I matted this onto some black card, then a white 8 x 8 card blank. I sewed it all down as I cannot doodle. At. All. Doodling scares me, yet I'm happy to stitch away - weird uh! I added a few sequins to break up the white a bit 'cos white space scares me too, but I'm trying...

Have a very happy day, and thanks very much for looking x

Monday, April 17, 2017

New Favorite Background

Here is how I did my flying Mona favorite background. Got a straw. Cut end into strips. Picked out 3 to 4 paints. Spread out paints on craft mat. Dip straw "paint brush" into paints. Dap on paper. I used mixed media paper but you can use any type. Repeat with other colors of paint. Then I set aside to dry. Then I stamped Flying Mona on a Copic friendly paper. Colored her with Copic markers to match the paint colors I used to the background. Then I cut her out. She needed a little glitter on her so I added glitter to her crown circle.  Edged her in black marker so she blends well. Then I added her to the card and edged the blue ink. Layered the panel on black cardstock. Then added that to a card. When I was done I looked at the card and thought it needed something so I added a saying from Tim Holtz small talk stickers. http://alteredcelticgypsy-cathy.blogspot.com/


Sunday, April 16, 2017

Another Favorite Background Technique: Masking + Gelliprinting

Greetings, Lost Coasters! Today I wanted to talk a bit about a cool background technique you can use with any stamped image and a little masking. Fire up your trusty gel plate and let's get going!

I made this piece using the Butterfly Face and Diamonds Borders stamps. I inked them with three colors of Stazon in purple, navy, and turquoise, stamped the images, and cut masks for them. 

Using repositionable adhesive, I tacked the masks down over the stamped images, then got to work with my gelli plate. For this piece, I used the 5" x 7" plate. (I cropped the final piece a bit so that I got a composition I liked.)

Onto the gel plate I rolled on three colors of acrylic paint (blue, purple, lavender) with a brayer. I dragged a pencil eraser (the kind that fits on the end of your pencil) through the paint to make the wavy lines, and pressed a texture plate into the wet paint to get the warped pattern most visible in the purples. (NOTE: Don't worry about being too perfect and precise with this--you want a loose cool arty effect!) Then I printed directly onto the masked images.

There was still a little paint on the plate and not enough textural interest going on in the blue area of the print for my taste, so I put a numbers mask down at the top, rolled just a bit of black paint onto the plate for a dryish, texture-y effect, and printed that on top of the still-masked Butterfly Face. I wanted to keep these numbers in the background as a quiet bit of additional interest, not steal focus from the beautimous Butterfly. 😜

Then--just remove the masks, and voila! You have a quirky, arty piece ready to go in no time at all!

If you try this technique, please be sure to let me know, because I would LOVE to see your projects. 😍 Happy stamping and gelli-printing!


Friday, April 14, 2017


LOST COAST DESIGNS HOW TO:  FAVORITE BACKGROUND TECHNIQUE


The Lost Coast Portal Challenge for the month of April features a favorite background technique.  I chose a technique called Faux Chin Colle.  There are so many great techniques out there, but I really like the layers and colors you can create with this one.  Here are the steps to follow to duplicate this technique:


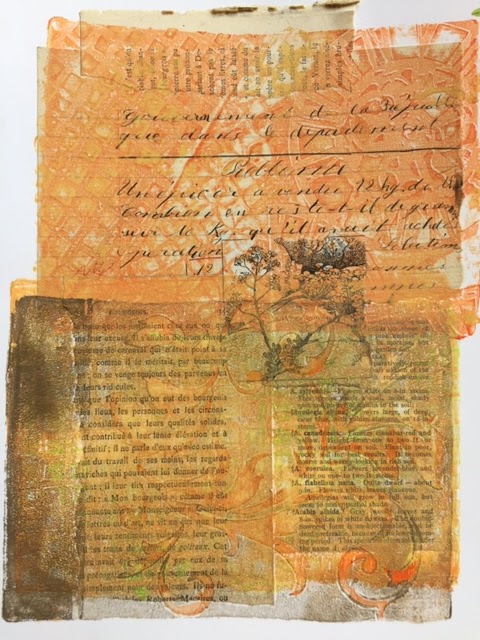
This background technique above is called Faux Chin Colle and uses a Gelli pad, acrylic paint, matte medium, stencils, and heavy and light weight papers.

Step 1:  Take a piece of heavy paper the size you want your project to be.  I used a sheet of 9 X 12 Bristol smooth white paper.  Using matte medium, adhere several pieces of lighter weight papers to create a simple collage.  I used a page from a vintage French book and a piece of a vintage map.  Once adhered to your paper, cover surfaces of your collaged objects with matte medium.  Allow to dry.

Step 2:  Select a paint color and cover your Gelli plate with the paint, using a brayer.  I used orange as my first paint color.  Place various stencils atop the paint, then smooth a sheet of light weight paper over the Gelli plate, pressing down to transfer the design to the paper.  I used three stencils for this one:  clock gears, circles, and a lattice design.  Remove paper and set aside.

Step 3:  Leave stencils in place on your Gelli plate and select a second paint color.  This time I used gold paint.  Using your brayer, roll that second color over your stencils only.  Cover with another piece of lightweight paper and press down to transfer the image.  Remove paper.  Be sure to save your lightweight papers from steps two and three as you can use those for backgrounds as well.

Step 4:  Remove stencils from the Gelli plate.  Take your dried collage sheet on the heavier paper and press down onto your Gelli plate, smoothing paper to transfer paint and images over your collage.

Step 5:  Using the Clock Square stamp from Carmen's Veranda, (www.carmensveranda.com/squares.html).  I stamped the image using black ink onto a piece of lightly shaded back ground paper.  I cut out around the image and embossed the edge in gold, then affixed it to my background paper.


Here are several more examples of some backgrounds I made using the same technique:


For this sample I used a whole 9 X 12 sheet of background paper.  On my other examples I used half of a sheet for each sample, so this one is larger.  I collaged pages from a couple of vintage books, a page from a vintage writing workbook, and a small sketch from an old gardening book.  I used yellow, orange and gold paints and the flourishes stencil, the clock gears stencil, and a squares stencil.  


For this one I used my matte medium to attach a piece of Tim Holtz Idea-ology tissue paper to my heavy paper.  I used pink, yellow and gold paints and several stencils, including circles and flourishes.  I love this tissue paper and it makes a beautiful background under you paints and stencils.


For this background, I used my matte medium to attach a strip of paper featuring pocket watches and a piece from a vintage calendar.  I used blue and gold paints and circle, diamond, and clock gear stencils.  This one also has more of the white background of the original paper left as an element.

Thursday, April 13, 2017

Design Team Update

Good morning all!  I have an announcement to make!  We have a added two new Design Team Members.  Please help me welcome Sue Davies and Cathy Norton to LCD/CV.

Hi, I'm Sue Davies, also known as Sue the Iron.  I live in the North of England with my husband and two grown children.  I retired from work last year, so in theory I should have lots of spare time - I don't know what went wrong there!

I've been crafting for about 10 years and love to play with inks and paints and most of all - stamps.  There is nothing quite like inking up new rubber or trying a new technique.  I've long been a fan of Lost Coast Designs and their fun, quirky stamps are right up my street so I'm really excited to become part of the team.
Hi, my name is Cathy Norton.  I have three kids, am married, and work part-time at Target.  I really enjoy stamping and got into art journaling about a year ago after watching YouTube videos by Dylan Reavely.  She make it OK to be messy to me.  I also like to make ATCs, mixed media, collage, and altered art.  Digital art is also a fun medium for me to work with also though my first love is rubber stamping.  I'm happy to say I'm a new design team member for Lost Coast Designs/Carmen's Veranda stamps.  I'm excited to be on the team and work with the great stamps and other design team members.

Everyone, please make Sue and Cathy welcome.  You'll be seeing a lot of really great projects from them in the very near future.

Happy Stamping!
Marilyn
DT Leader for LCD/CV


Wednesday, April 12, 2017

Beauty Mystery Magic

Good morning everyone.  Last month, the challenge over on the Portal blog was Black and White. Today I wanted to share with you how I created the Beauty, Mystery, Magic ATC for that challenge.

I started by stamping the NEW 5 Circles onto a piece of paper then cutting them out.  I them set them to the side.  Next, I stamped ATC Gothic Text onto the ATC and then added circles using a lid and white paint.  When that didn't show up too good, I switched to black paint and loved it.  I then took a paintbrush, dipped the bottom in black ink, and added dots around the circles.  Once the paint was dry, I added the 5 Circles I had cut out.  Finally, I stamped Beauty, Mystery, and Magic using Miscellaneous Words, cut them out, and centered them on the ATC.

Just goes to show what you can do with just two colors.  

Stay turned as our designers will be sharing their creations and how they were made through the month.

Marilyn aka Tarnished Rose
DT Leader