Some fun with the new Kitty stamps!
If you haven't checked out the new line of Kitty stamps at Lost Coast Designs, you need to go over there and see how much fun they are. There are 9 individual stamps and two sets each with three stamps included. These are super fun to stamp and color with your markers, colored pencils, paints, etc. You can find all the new Kitty stamps at www.lost-coast-designs.com/new.html
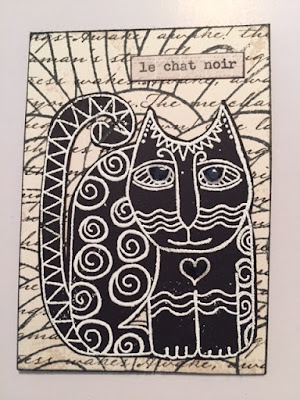
Le Chat Noir
For this ATC I used a simple black and white theme. I started with a printed piece of paper from a larger sheet. I stamped it with the Lost Coast "Zen Circles" background stamp, using black ink. (www.lost-coast-designs.com/new.html). Then using black card stock and white embossing powder, I stamped the "Cat Wavy Face" and set it with my heat gun. I cut it out around the edges and affixed it to the center of my ATC. I typed the sentiment on my old Royal typewriter - translated from French it means "black cat". Easy Peasy!
Le Chat Bleu
For this ATC, I used a background paper I had previously made with green, blue and yellow paints on my Gelli pad. I cut a portion to fit the front of my ATC and edged it with some blue ink. Using a blue stamp pad I lightly stamped the Zen Circle background onto my ATC. I stamped my same Wavy Face Kitty onto blue card stock using black ink. Using a white pen, I highlighted the various areas you can see to kind of highlight those features and make them stand out. I drew some eyes on my Kitty with white and black inks, filled in the little heart with pink marker, and then hit both those areas with my Glossy Accents. Then cut him out and
attached him to my ATC. And this little guy is named
The Blue Cat!
Play
For this one I used another background paper I had previously created using a circle stencil and green, pink and yellow paints on my Gelli pad. I stamped my Kitty with black ink onto white yardstick. Using Copic Sketch markers in blue, green, and pink, I colored my Kitty as above. I added some Glossy Accents to his eyes and glued a paper flower to his chest. I cut him out and then attached him to my ATC. I stamped the word "Play" with black ink and cut out around it. I attached it as shown using foam tape so it has a bit of dimension. The "Play" stamp can be found at Carmen's Veranda - www.carmensveranda.com/clearstamps.html. There are a whole new group of clear stamp words and phrases, including this one.


