Friday, April 14, 2017


LOST COAST DESIGNS HOW TO:  FAVORITE BACKGROUND TECHNIQUE


The Lost Coast Portal Challenge for the month of April features a favorite background technique.  I chose a technique called Faux Chin Colle.  There are so many great techniques out there, but I really like the layers and colors you can create with this one.  Here are the steps to follow to duplicate this technique:


This background technique above is called Faux Chin Colle and uses a Gelli pad, acrylic paint, matte medium, stencils, and heavy and light weight papers.

Step 1:  Take a piece of heavy paper the size you want your project to be.  I used a sheet of 9 X 12 Bristol smooth white paper.  Using matte medium, adhere several pieces of lighter weight papers to create a simple collage.  I used a page from a vintage French book and a piece of a vintage map.  Once adhered to your paper, cover surfaces of your collaged objects with matte medium.  Allow to dry.

Step 2:  Select a paint color and cover your Gelli plate with the paint, using a brayer.  I used orange as my first paint color.  Place various stencils atop the paint, then smooth a sheet of light weight paper over the Gelli plate, pressing down to transfer the design to the paper.  I used three stencils for this one:  clock gears, circles, and a lattice design.  Remove paper and set aside.

Step 3:  Leave stencils in place on your Gelli plate and select a second paint color.  This time I used gold paint.  Using your brayer, roll that second color over your stencils only.  Cover with another piece of lightweight paper and press down to transfer the image.  Remove paper.  Be sure to save your lightweight papers from steps two and three as you can use those for backgrounds as well.

Step 4:  Remove stencils from the Gelli plate.  Take your dried collage sheet on the heavier paper and press down onto your Gelli plate, smoothing paper to transfer paint and images over your collage.

Step 5:  Using the Clock Square stamp from Carmen's Veranda, (www.carmensveranda.com/squares.html).  I stamped the image using black ink onto a piece of lightly shaded back ground paper.  I cut out around the image and embossed the edge in gold, then affixed it to my background paper.


Here are several more examples of some backgrounds I made using the same technique:
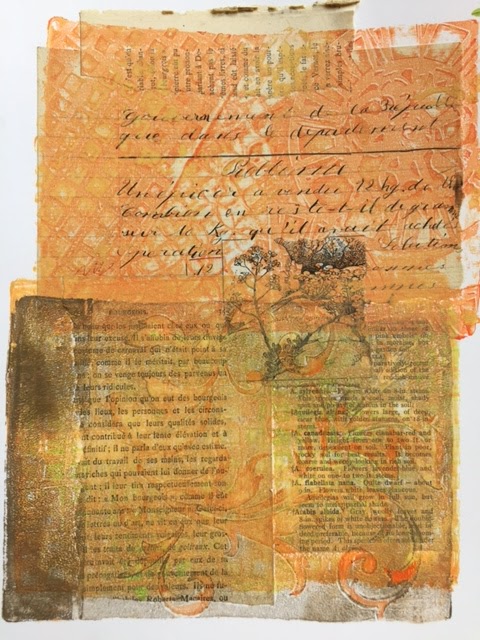


For this sample I used a whole 9 X 12 sheet of background paper.  On my other examples I used half of a sheet for each sample, so this one is larger.  I collaged pages from a couple of vintage books, a page from a vintage writing workbook, and a small sketch from an old gardening book.  I used yellow, orange and gold paints and the flourishes stencil, the clock gears stencil, and a squares stencil.  


For this one I used my matte medium to attach a piece of Tim Holtz Idea-ology tissue paper to my heavy paper.  I used pink, yellow and gold paints and several stencils, including circles and flourishes.  I love this tissue paper and it makes a beautiful background under you paints and stencils.


For this background, I used my matte medium to attach a strip of paper featuring pocket watches and a piece from a vintage calendar.  I used blue and gold paints and circle, diamond, and clock gear stencils.  This one also has more of the white background of the original paper left as an element.

Thursday, April 13, 2017

Design Team Update

Good morning all!  I have an announcement to make!  We have a added two new Design Team Members.  Please help me welcome Sue Davies and Cathy Norton to LCD/CV.

Hi, I'm Sue Davies, also known as Sue the Iron.  I live in the North of England with my husband and two grown children.  I retired from work last year, so in theory I should have lots of spare time - I don't know what went wrong there!

I've been crafting for about 10 years and love to play with inks and paints and most of all - stamps.  There is nothing quite like inking up new rubber or trying a new technique.  I've long been a fan of Lost Coast Designs and their fun, quirky stamps are right up my street so I'm really excited to become part of the team.
Hi, my name is Cathy Norton.  I have three kids, am married, and work part-time at Target.  I really enjoy stamping and got into art journaling about a year ago after watching YouTube videos by Dylan Reavely.  She make it OK to be messy to me.  I also like to make ATCs, mixed media, collage, and altered art.  Digital art is also a fun medium for me to work with also though my first love is rubber stamping.  I'm happy to say I'm a new design team member for Lost Coast Designs/Carmen's Veranda stamps.  I'm excited to be on the team and work with the great stamps and other design team members.

Everyone, please make Sue and Cathy welcome.  You'll be seeing a lot of really great projects from them in the very near future.

Happy Stamping!
Marilyn
DT Leader for LCD/CV


Wednesday, April 12, 2017

Beauty Mystery Magic

Good morning everyone.  Last month, the challenge over on the Portal blog was Black and White. Today I wanted to share with you how I created the Beauty, Mystery, Magic ATC for that challenge.

I started by stamping the NEW 5 Circles onto a piece of paper then cutting them out.  I them set them to the side.  Next, I stamped ATC Gothic Text onto the ATC and then added circles using a lid and white paint.  When that didn't show up too good, I switched to black paint and loved it.  I then took a paintbrush, dipped the bottom in black ink, and added dots around the circles.  Once the paint was dry, I added the 5 Circles I had cut out.  Finally, I stamped Beauty, Mystery, and Magic using Miscellaneous Words, cut them out, and centered them on the ATC.

Just goes to show what you can do with just two colors.  

Stay turned as our designers will be sharing their creations and how they were made through the month.

Marilyn aka Tarnished Rose
DT Leader

Thursday, March 30, 2017

Orient Enchantment Event: In-Depth Look at Projects

Hello again, Lost Coasters, and welcome to a post where I'll tell you how I made each of the projects that were posted to the Portal to Creativity in the hopes of inspiring you to participate in our Orient Enchantment event.

I made three ATCs using stamps from the India Set ...the first is "Do More Than Exist," whose directions are the simplest...


I stamped the god from the India set onto a gelli print, then colored him with creamy colored pencils (leaving some of the background showing through) and with white and shimmery copper gel pens. Then I affixed stick-on copper gems to the card and outlined the pattern with more white and copper gel pen. Oh, and added a text label, of course!


For "Talk To The Hand," I scraped some white gesso onto heavy cardstock with a palette knife and let it dry. This gave a bit of texture and a nice base for the next layer. I got out some Distress Crayons, scribbled some color here and there, and blended it with my fingertip (the gesso helps the Crayons smear more evenly than they do on plain paper).

Using permanent black ink, I stamped the Calligraphy Square from Carmen's Veranda for a little background interest. Next I stamped the mehndi hand from the India Set, colored it with gel pens in fluorescent and glitter greens as well as metallic golds and white, and cut it out and collaged it to the card along with the computer-generated sentiment.

To finish the card, I scraped some black glitter paste through a stencil to get the little ball effects on the sides...added 3D dots made of shiny white Enamel Accents and metallic gold Pearl Pen...and edged the whole piece in more black glitter paste. This added dimension and texture to the finished ATC.


For "I Is For Indian Peafowl," I first stamped the peacock from the India Set onto white cardstock and masked him off, then stamped the Taj Mahal behind him and masked that off. Next I applied Distress Inks with a mini blending tool around the masked images, then used the spritz-and-flick method to forcefully apply water droplets to give a mottled effect to the ink background.

Next I stamped the Clover Scroll Border along the bottom of the ATC and embossed the image with silver powder. I colored the clover scrolls with colored pencils, and added a border of dots made with metallic blue, gold, and white gel pens.

I painted the peacock with various colors of Twinkling H2Os--the shimmer on him was amazing in real life! Since the famous mausoleum is white, I left the Taj Mahal uncolored, revealing the plain white cardstock underneath the mask.

Lastly, I stamped and embossed the capital I from the Old Typewriter Alphabet, collaged the genus label onto the card, and edged it all in black chalk ink.

And there you have three very different ATCs, but all with a touch of exotic India. I hope you have fun with the India Set (there are many more wonderful stamps included with it than shown by these three projects!), or check out the Persian and Asian stamp sets from Lost Coast Designs as well for a little more Eastern flavor.


Wednesday, March 29, 2017

UNMASKED! Building a (Black and White) Collage Doll with LCD Stamps

Greetings, Lost Coasters! Today I have a tutorial for you on how I made this zany collaged doll for our Black & White challenge over at the Lost Coast Portal to Creativity. These same principles will help you build any sort of rubber-stamped collage.


PLEASE NOTE: This is the Cliff Notes version of the tutorial… For tons of photos, explanatory details, and A VERY COOL REVEAL VIDEO showing the masks being peeled off layer by layer to reveal the final collage, visit my blog! I lay it all out for you there!  😁

1. Plan out the composition. 

Gather the stamp images you'd like to use and start playing with them. You can stamp them and roughly cut them out to experiment with how to position them relative to each other. You could also use software such as Photoshop or InDesign to make a sketch. 

The stamps I used to make this piece were:

Elements from the Doll Accessories Set
Black Flourish
Bishop from Chess Set

2) Decide on your focal point. 

In all likelihood, this will be the image you stamp first--the one that appears on top of all the other layers in the collage, in the foreground. In my composition, it was the eyeglasses image.

3) Determine the order of operations.

Now you have to figure out the order in which you are going to stamp. Determine what is "foreground" and what is "background," and proceed in a logical order. The things that go behind, in the background, get stamped last.

4) Using your sketch as a blueprint...start stamping! 

I recommend the use of a stamp positioner or stamp press tool such as the MISTI. This allows you place each stamp exactly where you want it to print, and to re-ink the stamp to get perfect coverage in case an image prints a little unevenly the first time. 


5) Cut a mask for each image as you work. 

After you stamp each image on the "real" paper, stamp off onto some scrap paper, and cut that print out to use as a mask. I used repositionable adhesive to stick down my masks precisely over each image before stamping the next layer atop it. 

6) Remove the masks; oooh and aaaah.

Again, for a much more in-depth explanation packed with tons of tips, visit me here. And if you have any questions whatsoever about this process, please ask me in the comments over there. I’d love to help you guys try this out if you’ve never done a stamp collage before!


Monday, March 27, 2017

Wanderlust ATC

Hi everyone!  I wanted to share with you how I created the Wanderlust ATC for the Orient Enchantment event.

I started by spraying a piece of mixed media paper with LSG Hi Maintenance Magenta, Luscious Lime, & Sassy Sapphire.  I then stamped the two larger stamps from the Travel Stuff Set using Versamark ink and embossed with black EP.

I cut a section of the paper out to ATC size and edged with black ink.  Next, I stamped the hansa hand from the India Set and cut out.  I colored the hand with Prismacolor pencils.  Before adding the hand to the ATC I splattered the background with yellow and orange paint.

Finally, I stamped Wanderlust from the Travel Quotes Set onto a piece of cardstock then sprayed it with LSG Yellow Rose of Texas.

Thank you for joining me today.  Until later........................
Smiles~
Marilyn

Saturday, March 25, 2017

Journey ATC

Good morning everyone!  I wanted to share with you how I created the Journey ATC I made for the Orient Enchantment event.

I started by spraying a piece of mixed media paper with LSG Canna Lily Burnt Orange, wiping it with a baby wipe to remove some of the color.  Once it was dry I stamped the map from the India set using sepia ink and then cut it to fit my ATC. 

I then stamped the Matsya from the India set on another piece of paper using teal ink and clear embossed.  I painted the details using Metallique Ancient Coin and then cut him out.

Lastly, I stamped the "All journeys" quote from the Travel Quotes set using Timber Brown Stazon ink onto a piece of cardstock I had colored with watered down LSG Canna Little Burnt Orange.  I then assembled everything, popping up my image and saying with pop dots.

That's all for today!
Until later........................
Smiles~

Wednesday, March 22, 2017

Design Team Update

Good morning all!  I have an announcement to make!  We have a new Design Team Member.  Please help me welcome Laurie Davis to LCD/CV.
My name is Laurie Davis and I live part of the year in Andover, Mass. and spend the winters with my husband of 50 years (yikes!) in Palm Desert, CA.  We have two sons and a daughter and two grandsons - one in California and one in Massachusetts.  So we spend our time chasing them from one side of the country to the other.

I got into stamping and paper crafting about 15 years ago and was first introduced to rubber stamps at a Stampin' Up party.  I bought my first set and I haven't quit yet!  I not only love stamping but also journaling, mixed media, collage, assemblage, calligraphy - any kind of paper crafting really.  I am part of several swap groups and am a new member of the Lost Coast Designs Design Team.  I love Lost Coast Designs stamps.  To me, they are much more fun and interesting than some of the cutsie rubber stamps that are produced by a lot of the stamp companies out there.

I am excited by this new "creative" opportunity and look forward to working with all the other Design Team Members.
**************************************************************************
I'm sure Laurie will amaze you with her projects.  Stay tuned!

Don't forget, the Design Team Call is ongoing.  Go HERE to view all the details, then mail your application to Marilyn at mcgoo4@gmail.com.  

Happy Stamping!
Marilyn
Interim LCD/CV DT Leader

Friday, February 24, 2017

DESIGN TEAM CALL

It's time for a Lost Coast Designs Design Team Call!


We are looking for some new LCDesigners & one special LCDesigner Leader to join our fabulous Lost Coast Designs - Carmen’s Veranda team!  We are a relaxed but energetic friendly bunch and would love to welcome some fun-loving stampers with positive, professional, no-drama attitudes, who love working with eclectic and quirky rubber stamps, to join us.  This is an open call and successful applicants will be notified as I select new members.   We are looking for North America and Europe based stampers only.  Please note that there are some limitations for Europe based members which I will discuss with you. 

DT term is one year but a 6 months option is available too so please specify which option you are interested in.

Please read over our DT Requirements carefully and consider your current obligations before applying.  Joining a DT is fun and a way for you to share your love of creating but it is also a commitment and you are expected to do your best for our team regardless of how many other teams you serve on so make sure you fully understand what being a LCDesigner entails and feel free to ask questions if you need anything clarified. 

If you think our team is right for you then we’d love for you to apply by emailing Marilyn (LCD/CV Interim DT Leader) at mcgoo4@gmail.com.   Please put “LCDesigner Application” in the subject of your email and provide the following information.  Thank you for your consideration and we look forward to meeting you all! 
  • Name, address, phone number (best number to contact you on if needed) and email address.
  • 1 year or 6 month DT term.
  • Short biography - tell us a little about yourself and why you would like to join our DT
  • Links to your online galleries, blogs, Facebook, Instagram, Pinterest, etc.
  • List any Design Teams you are currently on and have previously been on.  Please note that past DT experience is not necessary, all are welcome to apply.  
  • Include 3-5 project photos that best shows your style and quality of work (please try and keep file sizes small).
DESIGN TEAM PERKS
  • Access to a generous selection of quality rubber stamps from Lost Coast Designs and Carmen’s Veranda at no charge. 
  • Access to Nuance Powders which are available to you at wholesale cost - use of these powders is encouraged but not a DT requirement.
  • Your paper art projects proudly displayed at stamp conventions in the USA and Europe.
  • Exposure on our Lost Coaster’s Review DT blog, Lost Coast Portal to Creativity event and challenge blog, Lost Coast Designs & Carmen’s Veranda company Facebook Pages and our LCD/CV Facebook Fan Group.
  • You will be featured on our Meet the DT Blog Page with a bio and an optional photo.
  • You get to create with and be inspired by a group of very talented stampers and participate in lots of fun events.
DT REQUIRMENTS
  • Work with all our stamp images regardless of personal tastes and preferences.
  • Be a good communicator, reliable, dedicated & on time with deadlines and able to work with themes in a team environment. 
  • Be able to take good photographs to showcase your art well.
  • Have an active personal blog to share your creations.
  • Display 4-5 badges (4 permanent, 1 temporary) on your personal blogs to promote LCD/CV and our various activities.  
  • Actively promote our stamps and activities on your personal blog, Facebook, Twitter or Pinterest, etc, as much as possible.
  • Be an active member of our official LCD/CV Facebook Fan group as well as belong to our private DT group. 
  • Be willing to host a challenge or 2 on our Facebook Fan group and participate in various events like blog hops, etc.
  • Share one project per month on our Lost Coaster’s Review DT blog on assigned dates - posts are to be engaging, written in English, easy to follow with info on what was made and how it was done, either as a brief summary or in tutorial form. 
  • You will be on Blog Challenge Duty, as part of one of our 2 teams, every second month which involves creating an inspiration project, commenting on the entries and voting for the winners.  
  • You are free to make whatever projects inspire you from cards, ATCs to altered and mixed media art.
  • However, you are required to mail in some none bulky paper art projects to Lost Coast Designs for display at our convention booths across the USA and Europe.  There are no deadlines or quantity limits for this part of your DT commitment.
PROJECT REQUIREMENTS
A minimum of 24 projects per one year term (2 per month) with the option to make more and a minimum of 2 extra projects for the 31 Days of Halloween blog hop broken down as follows: 
  • A minimum of 6 projects per year for our monthly Blog Challenges.
  • A minimum of 14 projects per year to be divided equally between our Blog events and Facebook group events.
  • Make a minimum of 2 projects for an annual Halloween blog hop/event in October (participation for 2017 will be determined later this year).
  • Mail in paper art projects to Lost Coast Designs for display at convention booths in the USA and Europe! 
Happy Stamping!
Marilyn
Interim LCD/CV DT Leader

Thursday, February 23, 2017

February Is For Lovers: Or, When I Am King You Shall Be Queen

Hello stamplings! Today for your creative delectation I'm going to walk you through the piece I made for our Lovers event, "When I Am King." (You have two more days to enter your lovers-themed art --until midnight, February 25th--for your chance to win cool stuff! Click on the link in this paragraph and find out the deets if you haven't already entered!)

Do you guys know the children's rhyme "Lavender's blue, dilly dilly"? I took it as my inspiration as I was looking at our fab king and queen chess pieces from the Chess Set. You know how some men will promise you anything, right? LOL So here's our lovable braggart king making you his queen.


Here's how I did it.

Using permanent (waterproof) ink, stamp the awesome king and queen onto hot-press (for a smooth surface) watercolor paper. Stamp and cut masks for the figures, and place the masks over the stamped images.

Sprinkle blue, purple, and gray Nuance powders liberally about! At this point, your piece will look approximately like this:


Now go town and mist the powders with water to your heart's content. Watch the magic happen as they bloom and blend! I like to leave them a little dry in spots for texture, but you're the boss here.

I next used a checkerboard stencil to suggest a chess board, and spritzed some more color through the stencil. (Did you know that you can use the Nuance Powders to make your own sprays? Yep--just put a bit in a mister, add water, and you're good to go!)

Let dry, and stamp "king" and "queen" with the Old Typewriter Alphabet, and emboss with silver EP. I outlined the letters in black artist pen to help them stand out, which also has the advantage of giving the letters more of a funky, arty, handmade look. The other text was computer-generated and collaged on.

With the masks still in place, drizzle and splotch some white and silver acrylic paint to bring light to some of the dark areas and add a little dimension to the piece.

When dry, remove the masks, and paint the figures with pale washes of lavender, blue, and purple. Accent the figures with sparkly silver glitter gel pen to further catch the light. Edge the piece with lavender chalk ink.


You are done! Admire the fruits of your labor...and maybe go give the king a kiss for elevating you to royal status!